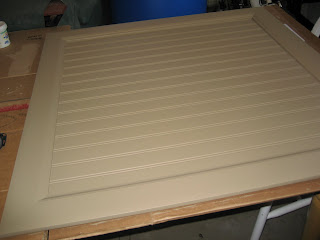
I made a frame out of bead board and molding as a background for a wreath that I already had. I loved the way it turned out! This is what you'll need:
Bead Board (buy a sheet at Home Depot or Lowes)
Molding
Wood Glue
Clamps
Finish Nails
Paint
Paint Brush
Paint Glaze
Old Rag
Wreath
My wreath was about 3 feet by 3 feet, so that's what I cut my bead board to be and then I cut the molding into four 3 foot sections. Be sure to cut the molding so that the decorative skinnier part is on the inside of the angle, so that the corners line up.
Use wood glue to glue the molding to the bead board and hold it with clamps until completely dry. I let mine sit overnight. Even though everything was measured and I thought it all lined up, I still ended up with a slight gap at one of the corners, so I used some spackle (nail hole filler) to fill the gap up. Be sure to let it dry completely before painting. I also tapped in a few tiny finish nails from the back to hold the molding on a little bit better. I didn't want to have to try to cover the nail heads from the front, so I bought the 1/2" nails so I could tap them in from the back and not have them poke through the front.
It looked so beautiful and white, I almost didn't want to paint it, but I painted it a darker tan, since my walls in my house are a light tan. I ended up doing two coats of paint so that it looked completely even. Next up was the glaze. I had never glazed before, but I've always wanted to try it, so I tried to search online for what people have used for glazing crafts and I couldn't find much, so here is what I used:
I bought a Glaze Base for acrylic paint and a dark brown acrylic paint and then mixed it in a cup according to the directions on the back of the glaze bottle. I started out using a sponge brush to apply the glaze, but it was leavings bubbles in the edges, so I switched to a regular paint brush. I first covered the entire section with the glaze and then I used an old rag to wipe off the excess glaze. I did one strip of the bead board at a time to make sure it didn't dry before I had it looking how I wanted it to look.
The edges were kind of tricky, because it seemed to goober up so much against the molding, but after a while I found a way that worked pretty well. I put a small line of glaze right next to the molding and then I turned my paint brush vertically and pulled it out, it still usually had too much glaze and I would wipe it off and then pull it out again. That way it kind of blended in to the rest of the bead board and wasn't too dark.
After I finished glazing the bead board, I glazed the molding. I ran my paintbrush along the outside edge and the inside edge and then used my rag to wipe off most of it. By this time the rag was so dirty, that even though I didn't paint any glaze on the middle of the molding, it still had a little rubbed over it as I took the rag along the edges. I tried to keep more glaze right along the outside edge and the crease in the molding to accent those edges.
I bought some picture hanging wire and some of those little hooks that screw into wood. Make sure that you screw them in on the edges of the bead board where the molding overlaps, because the bead board is only 1/4" thick and you don't want them to pop through the front, and then tie the hanging wire through the hooks and hang on a nail. I wasn't sure how to attach the wreath, so my husband came up with the idea to drill some holes through the bead board and use the picture hanging wire to attach it. So we found where the wreath would sit on the board and marked where each side would attach. We drilled two holes about an inch apart on each side. Then we fed the hanging wire through one hole, through the metal base that the wreath was on, and back through the other hole and tied it in the back and then did the same for the other side of the wreath. You can't tell the holes or the wire is there and then we didn't have to pound a nail through 1/4" bead board and into the wall behind it for the wreath to sit on. If any of you have a better idea, please post a comment and let us all know! Here's the finished product!


No comments:
Post a Comment