
Monday, September 27, 2010
Make It Bold
Thursday, September 23, 2010
Bead Board Frame for a Wreath

I made a frame out of bead board and molding as a background for a wreath that I already had. I loved the way it turned out! This is what you'll need:
Bead Board (buy a sheet at Home Depot or Lowes)
Molding
Wood Glue
Clamps
Finish Nails
Paint
Paint Brush
Paint Glaze
Old Rag
Wreath
My wreath was about 3 feet by 3 feet, so that's what I cut my bead board to be and then I cut the molding into four 3 foot sections. Be sure to cut the molding so that the decorative skinnier part is on the inside of the angle, so that the corners line up.


Use wood glue to glue the molding to the bead board and hold it with clamps until completely dry. I let mine sit overnight. Even though everything was measured and I thought it all lined up, I still ended up with a slight gap at one of the corners, so I used some spackle (nail hole filler) to fill the gap up. Be sure to let it dry completely before painting. I also tapped in a few tiny finish nails from the back to hold the molding on a little bit better. I didn't want to have to try to cover the nail heads from the front, so I bought the 1/2" nails so I could tap them in from the back and not have them poke through the front.


It looked so beautiful and white, I almost didn't want to paint it, but I painted it a darker tan, since my walls in my house are a light tan. I ended up doing two coats of paint so that it looked completely even. Next up was the glaze. I had never glazed before, but I've always wanted to try it, so I tried to search online for what people have used for glazing crafts and I couldn't find much, so here is what I used:

I bought a Glaze Base for acrylic paint and a dark brown acrylic paint and then mixed it in a cup according to the directions on the back of the glaze bottle. I started out using a sponge brush to apply the glaze, but it was leavings bubbles in the edges, so I switched to a regular paint brush. I first covered the entire section with the glaze and then I used an old rag to wipe off the excess glaze. I did one strip of the bead board at a time to make sure it didn't dry before I had it looking how I wanted it to look.


The edges were kind of tricky, because it seemed to goober up so much against the molding, but after a while I found a way that worked pretty well. I put a small line of glaze right next to the molding and then I turned my paint brush vertically and pulled it out, it still usually had too much glaze and I would wipe it off and then pull it out again. That way it kind of blended in to the rest of the bead board and wasn't too dark.

After I finished glazing the bead board, I glazed the molding. I ran my paintbrush along the outside edge and the inside edge and then used my rag to wipe off most of it. By this time the rag was so dirty, that even though I didn't paint any glaze on the middle of the molding, it still had a little rubbed over it as I took the rag along the edges. I tried to keep more glaze right along the outside edge and the crease in the molding to accent those edges.

I bought some picture hanging wire and some of those little hooks that screw into wood. Make sure that you screw them in on the edges of the bead board where the molding overlaps, because the bead board is only 1/4" thick and you don't want them to pop through the front, and then tie the hanging wire through the hooks and hang on a nail. I wasn't sure how to attach the wreath, so my husband came up with the idea to drill some holes through the bead board and use the picture hanging wire to attach it. So we found where the wreath would sit on the board and marked where each side would attach. We drilled two holes about an inch apart on each side. Then we fed the hanging wire through one hole, through the metal base that the wreath was on, and back through the other hole and tied it in the back and then did the same for the other side of the wreath. You can't tell the holes or the wire is there and then we didn't have to pound a nail through 1/4" bead board and into the wall behind it for the wreath to sit on. If any of you have a better idea, please post a comment and let us all know! Here's the finished product!
Monday, September 20, 2010
Another Birthday Card...

Thursday, September 16, 2010
Oops

Things needed:
Adhesive magnetic strip ( I got this from Michaels)
Modge podge
E600 glue
1 piece of super cute scrapbook paper
acrylic paint to match your scrapbook paper
stamp ink (to ink the edges)
5x6 inch sheet of aluminum
thin piece of Ply wood cut to desired size, (I bought a bundle of wood plaques from Michaels and used one of those pieces.)
Letter stickers or vinyl saying (optional)

First you are going to cut your scrapbook paper a little smaller then your ply wood. Ink the edges of the cute paper with ink. (I like to use Brown ink)

Next paint the edges of your ply wood and sides.


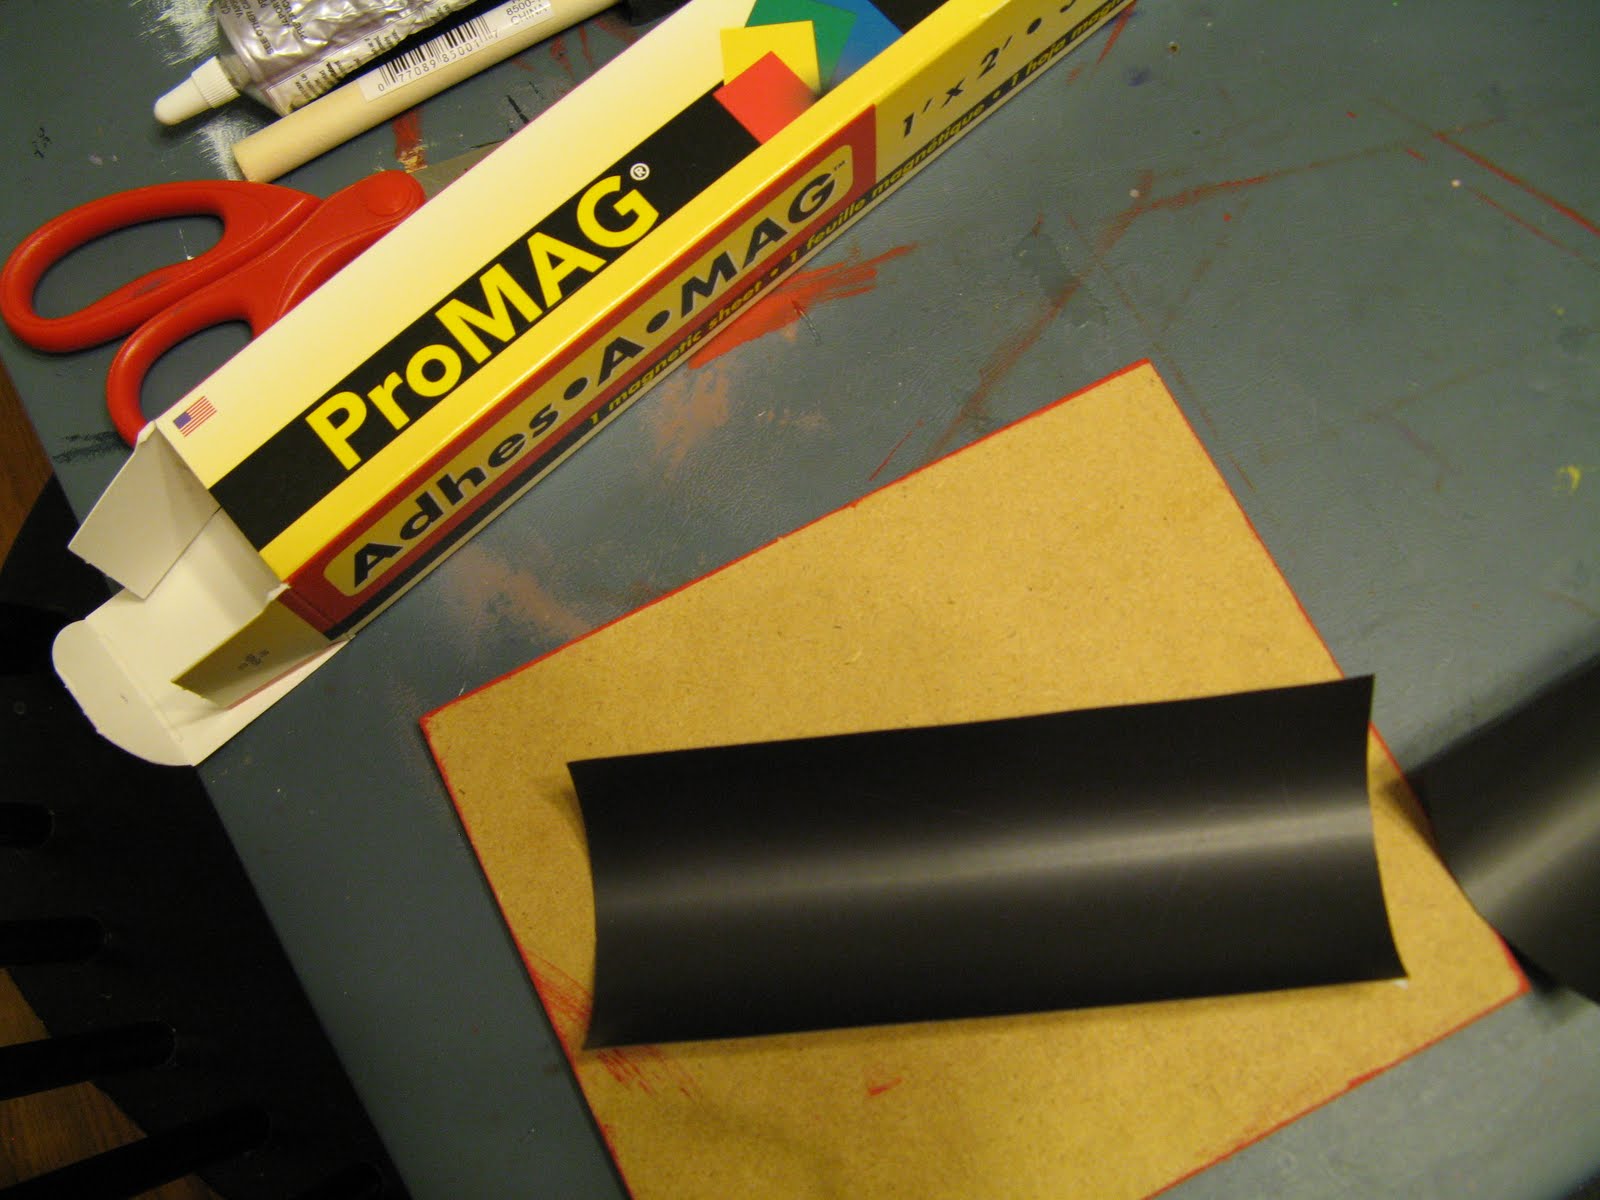
Cut and place the magnetic sheet so it covers most of your wood, unless you have really strong magnets, then you can use those.
There you go, a dry erase board for you fridge. You can make bigger or smaller ones, and embelish them all you want.
Halloween Door Hanger

"One Man's Junk is another Man's Treasure"
I found these pieces of wood in the dumpster of a cabinet shop. I took a couple of pieces, and came up with this Door hanging decoration. You don't have to make it a Halloween door hanger, you can use any type of paper, or ribbon for this project. The only bummer is I didn't grab more pieces!
Things needed:
3 pieces of 1.5inch by 3/4 inch by 9 inch wood
Chain ( I used silver Jewelry chain)
Ribbon
Scrapbook paper
Acrylic Paint to match your paper for the wood
10 eye hooks
Modge podge
paint brush


First you are going to sand the edges of your wood. Then you will need to paint them the colors that match your paper


Then I took some black paint and I stressed the corners of the wood. (to stress the corner put a little bit of paint on a brush you don't care to have ruined. Stroke it on some paper until there is only a little bit of paint, and then take the brush and stroke the edges of the wood softly.)

Next you put the eye hooks on the wood like this:
Top Piece and middle piece: on the top and bottom part of the wood place eye hooks on both the left and right sides so you will have four eye hooks on each piece.
The bottom piece: place eye hooks on left and right sides only on the top of the wood
Disconnect the chain so you have four 2 inch strips and one 14 inch strip.
Connect the three pieces of wood by linking together the bottom piece of wood to the middle piece placing the chain ends in the eye hooks, and the middle and top piece by placing the chain on the middle top wood eye hooks, and the bottom of the top wood piece eye hooks.
To finish the project connect the 14 inch chain to the two top wood piece eye hooks, add a bow and there you go a darling decoration to your door.
*IDEA* While making this I thought it would be cute to do one that said Friends always Welcome, or Welcome to our house. You can really do a lot of things with this craft
Monday, September 13, 2010
Ribbon Flower Bow
I really should not post another craft idea, but I really do not want to clean my house right now, so here you go. I think these hair bows are so darling on little girls. The nice thing is they are so easy to make, they take about twenty minutes, but they are so worth it.

Things needed:
1-1.5 inch wide ribbon 3/4 -1 yard
(if you want to have more layers use more ribbon)
Bead, or button
Sewing machine,
Needle
Thread
Hair clip
Glue gun

First you are going to sew the a gathering stitch (this is usually a 4 or 5 stitch length)

Gather the ends so it curls

Make a circle with your ribbon,

make another circle layer and then using your needle and thread sew the insides together,
continue doing this with each layer,until you have no more ribbon left.


It should look like this. Now tie off your ends. On this bow I hand stitched a bead as the center, but you could use a button or a brad.

Now you can glue it onto your hair piece.
And there you go, a cute hair piece for you little princess! (or a friend)
Got Sparkle Sketchers?
My daughter has been begging me for some sparkle sketchers. I couldn't get myself to pay $40 for a pair of shoes that would be worn out before the middle of the school year. So I found a pair of shoes from Walmart for $3 and decided, what the heck, I will make my own sparkle sketchers.


I also got some white sparkle shoe laces to go with the shoes from Payless Shoe. These were fun to make, and I am sure my daughter will be kicking around in them for a while!

First I painted the top part white with acrylic paint.

Now time to decorate. You can do any decoration you like. My daughter loves butterflies, hearts and flowers, so using acrylic paints I colored those shapes on the shoes. Then I used a permanent marker to outline the shapes.

Now it is time to add some sparkle. I used fabric puff sparkle paint that I also got from Walmart. I covered the whole shoe (except the white part) with blue sparkles, and painted everything with the sparkle paint that matched the color. So for example I painted over the heart with pink sparkle paint.
Then I used rhinestones from Michaels and glued them on with guerrilla glue (this stuff pretty much glues everything together)
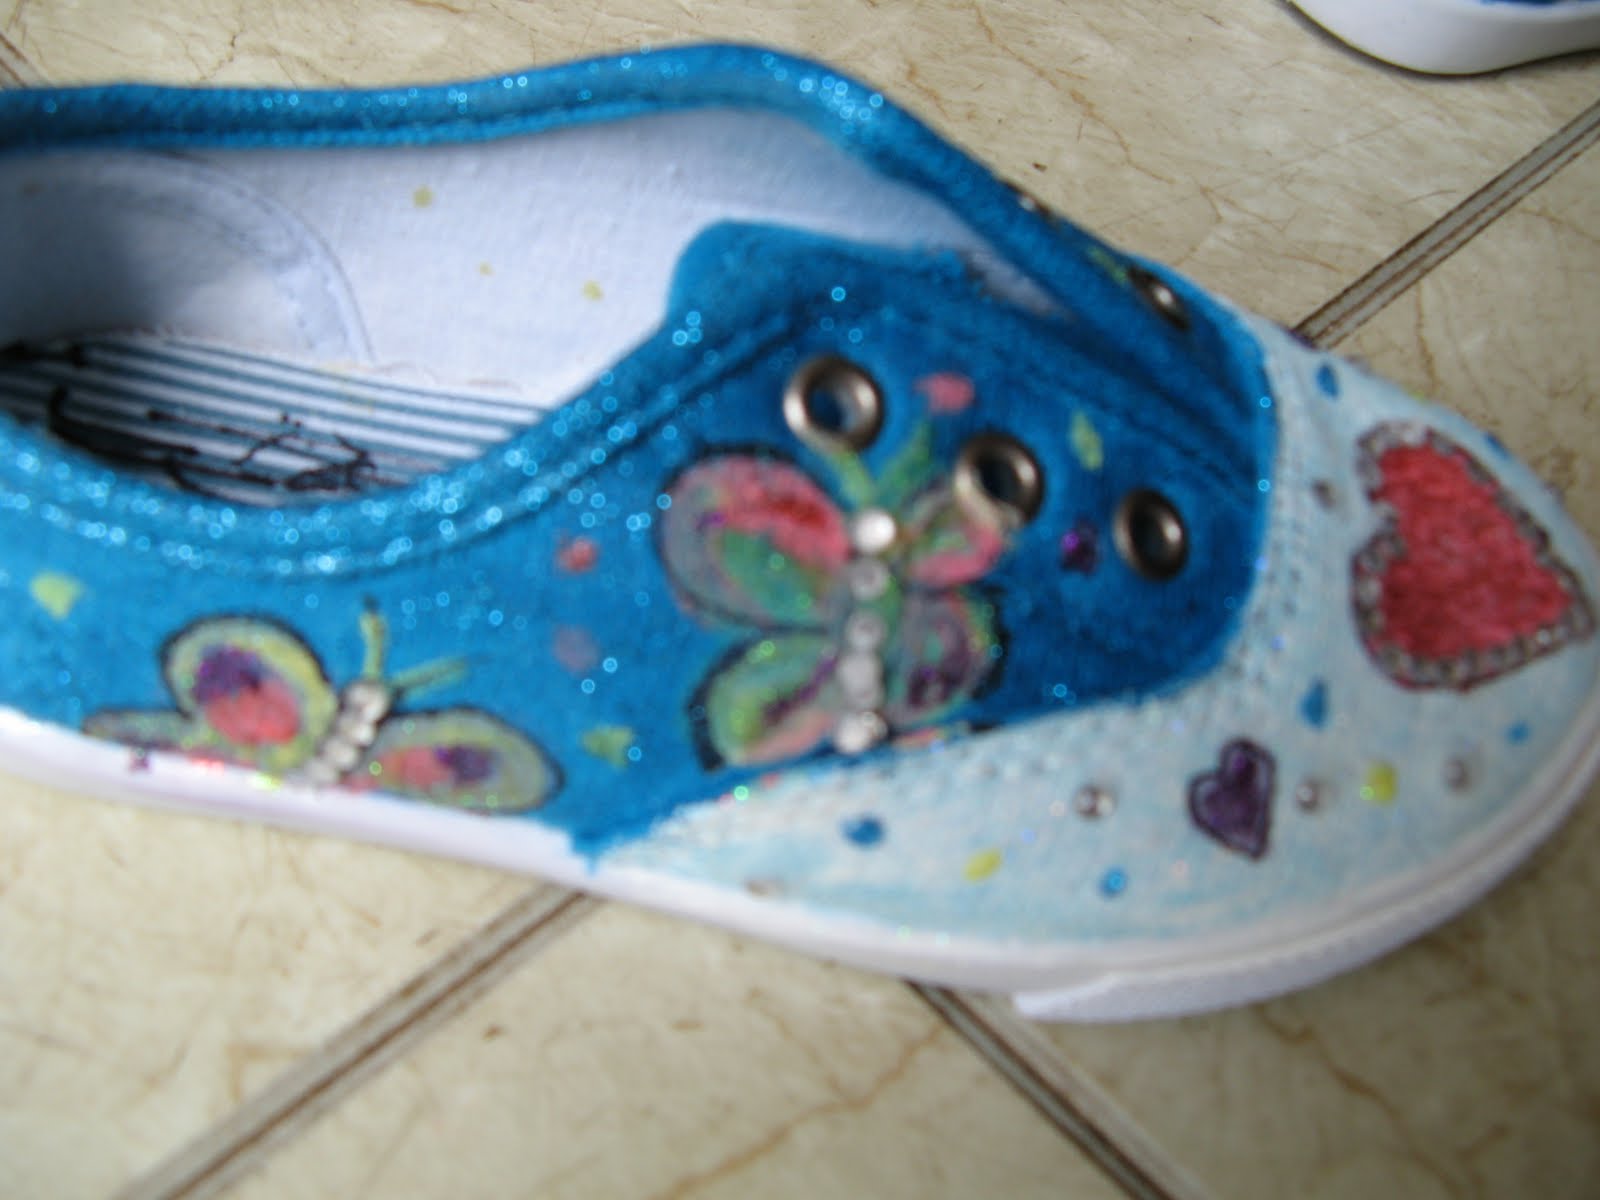
I also got some white sparkle shoe laces to go with the shoes from Payless Shoe. These were fun to make, and I am sure my daughter will be kicking around in them for a while!
Friday, September 10, 2010
Fall Picture Card
Here is a great way to send a greeting and a picture at the same time. It is cute enough for a grandparent to feature on their fridge.
 Start with a printed background paper that uses fall colors like orange, yellow, and brown. Cut out a rectangle that is 11 inches by 8 1/2 inches, then fold it in half. If you used a thin background paper you will need to glue it to some cardstock first.
Then find a picture that you want to attach. Cut the picture so that it fits your card. Then glue the picture to a coordinating color and cut out a rectangle about 1/4 inch larger than the picture. Glue the picture and frame to the card.
To add the ribbon layer twist the ric-rac a few times and then attach to the paper using brads.
The last step is your message. Cut out a rectangle with a different coordinating color than you used for the frame. Then either use a stamp, hand write, sticker, or print out a fall greeting and put it on the rectangle. Then attach this with the same brads you used on the ribbon.
Have fun creating!
Monday, September 6, 2010
Free Digital Scrapbook Template
I am an avid digital scrapbooker. Right now I am scrapbooking our family reunion in Yellowstone as a present for my mom. I use Photoshop Elements 6. Here are some pages I made of us cooking smores. I really love using ribbon or string on pages. It adds an interesting quality. The key is to copy pieces of the ribbon and then layer it on top of the pictures. So that the ribbon looks like it is both above and below the pictures. To create this affect have the ribbon layer below the picture, then copy the part of the ribbon that you want above the picture and place the copied ribbon layer above the picture. Line up the two pieces of ribbon.


Here is a link to download the template that I used for free. Then try adding some ribbon to your page and have fun creating your own digital scrapbooking pages.
Thursday, September 2, 2010
Any occasion card

For this card you can pretty much use
any 2 coordinating papers and ribbon
that you have on hand. The flowered
paper is cut in 2 inch strips and the
solid is a 1 inch strip. I cut the strips
the full length of the card so that
they overlapped each other when
glued on. I bought a jar of multi-
colored paper flowers that I have
been using for years . You could
also cut out flowers from your print
and use those. When you tie the
ribbon on open your card flat, lay it
on a cutting board or mat and make a small slit the width of your ribbon on the spine
of the card. Then pull the ribbon through and tie it in a bow or knot in the front. Before
I glued my card together, to add a little something more, I pressed the front center of
my card lightly on my ink pad and then chalked the edges of my flowers. Which means that I just rubbed the edges of the flowers over an ink pad. This adds an extra dimension. You could
also stamp words or glue something else in the place of the flowers.
Subscribe to:
Posts (Atom)